Are you looking for ways to change the location of OST files? When you integrate MS Outlook with Exchange tool, MS Outlook automatically creates a local OST file. You can change the location of OST files manually. OST or Offline Storage Table is a vulnerable file format. It is associated with your IMAP, Exchange, or Office 365 account in MS Outlook. The file saves locally. The default location can vary depending on the MS Outlook version and the Windows version you are working with.
Manual Steps to Relocate OST or Outlook Data File Location
For Windows 10 users, here are the manual methods to practice to change location of the MS Outlook 2019, 2016, 2013, and 2010 versions.
Solution 1: Define the ForcePSTPath Registry Entry
If you are aware of Windows Registry Keys like ForcePSTPath, it is easy for you to relocation the location of OST files. The following method helps to change the location of OST files for Outlook 2019, 2016, 2013, 2010, 2007, or 2003 versions.
Note: Remember, there are different locations for different Outlook versions for OST files.
Now, follow the given steps:
- On your Windows system, press the Windows plus R keys together. In the Open box, enter Regedit and then OK tab.
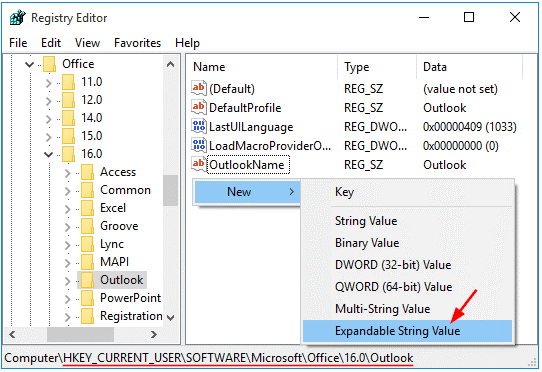
- It will open the Registry Editor. Enter the right key considering the Outlook version you have.
- Outlook 2016 users can enter the below mentioned key-
HKEY_CURRENT_USER\Software\Microsoft\Office\16.0\Outlook
- Outlook 2013 users provide the below key:
HKEY_CURRENT_USER\Software\Microsoft\Office\15.0\Outlook
- If you have Outlook 2010, enter the below key:
HKEY_CURRENT_USER\Software\Microsoft\Office\14.0\Outlook
- If you have Outlook 2007, provide the below key:
HKEY_CURRENT_USER\Software\Microsoft\Office\12.0\Outlook
- In the windows of Registry Editor, on the right pane, right click on an empty area. In the New, you will get various options, select Expandable String Value.

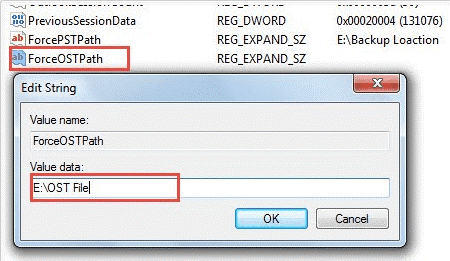
- It will create a new value that you can edit in the Edit String dialog box, give a name to the ForceOSTPath value and provide the new location, in the Value Data box and press OK.

Now, exist from the Registry Editor and restart MS Outlook application.
Note: As a new Exchange email account is set up, it will create a new Outlook OST file at the default location.
Solution 2: Taking Help of MS Outlook Email Client
Do you know you can relocate the location of OST files through MS Outlook email client? However, there are some changes in the method depending on the Windows OS version you are using.
Note: It is an effective method to apply for Outlook 2013, 2010, 2007, and 2003 versions.
If you are a user of Windows Vista, 7, 8, or 10, the target location of the OST file will be:
C:\Users\%username%\AppData\Local\Microsoft\Outlook
If you are using Windows XP, the default address of Offline Storage Table will be:
C:\Documents and Settings\%username%\Local Settings\Application Data\Microsoft\Outlook
Here are the steps you can follow to change location of OST files:
- In MS Outlook, go to the File menu, then Account Settings and choose the Data Files.
- From the list, check the Exchange Server account and press Settings.
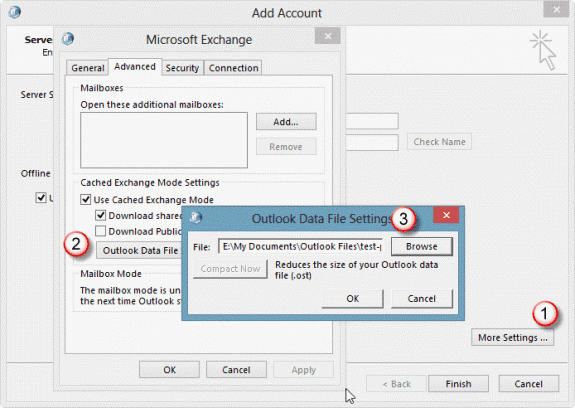
- In the Microsoft Exchange account, click on the Advanced option, uncheck the Use Cached Exchange Mode checkbox and hit ‘OK’.

- Press the OK tab if it prompts you to do so.
- In the Advanced tab, select Outlook Data File Settings, then Disable Offline Use and press Yes.
Note: If the Disable Offline Use feature is not displaying, go back to the step 3 and uncheck the Use Cached Exchange Mode checkbox.
- Select Outlook Data File Settings and then the ‘I want to move the old file’ option. Press the Browse tab to choose the desired OST file and press Open. It will create a new Outlook OST file.
- In the Advanced section of MS Exchange account, check the Use Cached Exchange Mode checkbox and click OK. If you receive the message to restart Outlook, press OK.
- Switch off the Account Settings and the Mail Setup box.
Note: A new OST file will be created, but you will have to delete the old OST file manually.
Solution 3: Apply the Symbolic Links to Repoint OST Location
Do you know you can take help of Symbolic Links to change the default location of OST files to another location? With the help of MKLINK command you can use symbolic link.
Here are the steps to follow to create a symbolic link:
- Moving the OST file from the default location to a new location.
- Access the Command Prompt window using the admin login.
- Now, enter the mklink command: mklink “C:\old-path” “D:\New path”. Here is the idea to enter the command.
mklink %localappdata%\Microsoft\Outlook\<file name> “D:\Outlook Data Files\<file name>”
Ensure that the command is correct. It will create the symbolic link.
Note: The techniques will create a default location of the folder. Don’t delete the shortcut else it will make the link inaccessible. The file will move to the original location.
OST Conversion
If you find the above methods tricky to relocate OST files and want to convert OST files to Personal storage table, you can use the TrustVare OST File Converter. It is an advanced application that relocates the location of OST files and unable conversion of OST data files to Personal storage table swiftly. The utility can repair damaged or inaccessible OST files as well.
Here are the Steps to Follow
- Download the application on your Windows system.
- Now, choose either File Mode or Folder Mode and then the “Browse” tab
- After this step, upload the OST files from local folders and get the preview to deselect unused folders
- Now, select “Export to PST” to change the format and then the “Browse” button to save the output.
- Finally, press the “Convert” button to complete the process.
Conclusion
You have varied options to relocate OST files to Personal storage table. If you are not so technically well-versed, hire a technician to pursue the task.

