MS Outlook allows its users to create and manage more than one email account. For each email account, the advanced tool creates a separate data management boxes. In this article, we will discuss the distinct ways to sort or view email messages as per their accounts. Steps are easy to follow.
Solution 1: Creating Account-Specific Folders
If you are working for more than one company, it is good to create separate accounts for each one to manage emails. It is possible by creating new download folders per account. Here are the steps to follow.
- For Outlook 2007, navigate Tools menu and select Account Settings. For Outlook 2010/2013, navigate the File menu and click on Account settings.
- After that select the POP3 account for re-configuration.
- Now, press the Change Folder option.
- Create a new folder or select a folder where you want to download POP3 account mails.
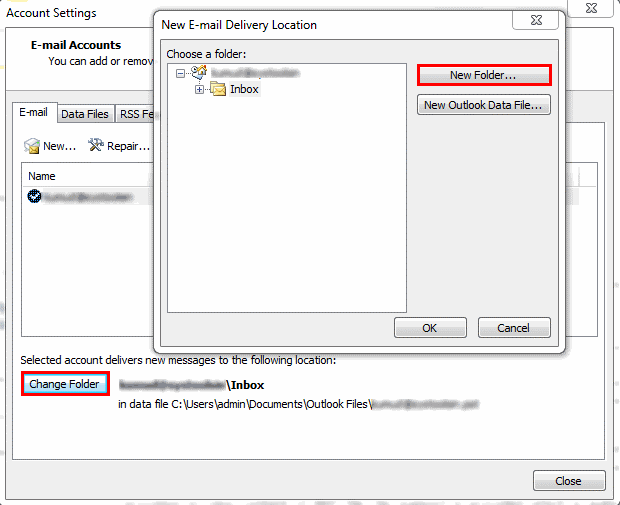
Press OK and get out the tool. It is how the process will complete.
Solution 2: Creating a Rule
MS Outlook supports creating rules feature. They are user-defined rules and can change the flow of emails and saved to the defined account. Use the rule to manipulate arrival of an email from specific account also. Here are the steps to follow.
- Choose the Inbox folder in your Outlook
- For 2003 and 2007, navigate Tools and select Rules & Alerts. For Outlook 2010 and 2013 versions, navigate File and then select Manage Rules & Alerts option.
- After that, press the New Rule option which is on the E-mail Rules tab.
- In Outlook 2003 and 2007, Check the message while in Outlook 2010 and 2013, choose the Apply Rule on Message I Receive option and press Next.
- After that, check the “through the specified account” option in Select conditions section
- Press the link featuring in the bottom pane connected with “Specified”
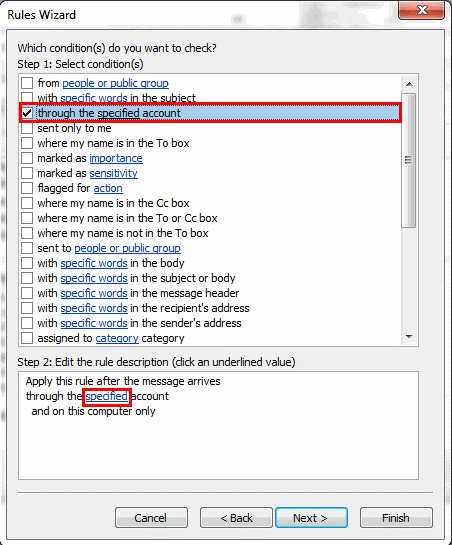
- A new window will open with menu of accounts.
- Select a suitable account from drop-down and then OK, after that, Next.
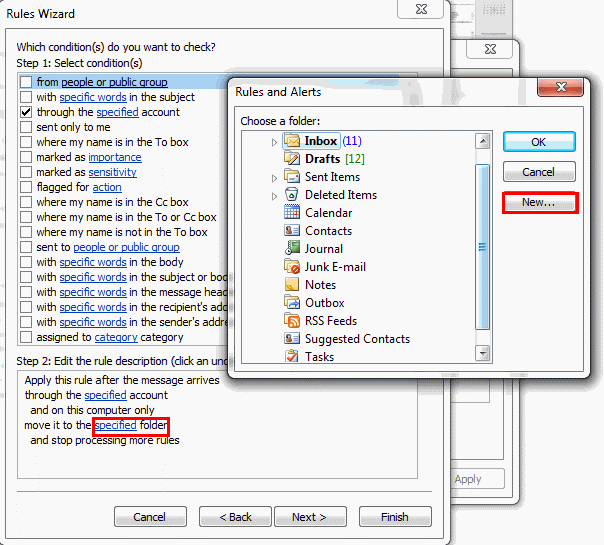
- Shut down the Manage All Views pop-up and return to the Mail window. Check the option move it to specified folder.
- Click on the specified folder link which will open the Rules and Alerts windows, select the desired folder that you wish to download emails from this account. Press New and then a new folder is created.
- Press Next and give a name to the rule of your choice
- Check the “Run this rule now on messages already in Inbox” option that move the message to the given account. Also check “Turn on this Rule” option and then click Finish and OK.
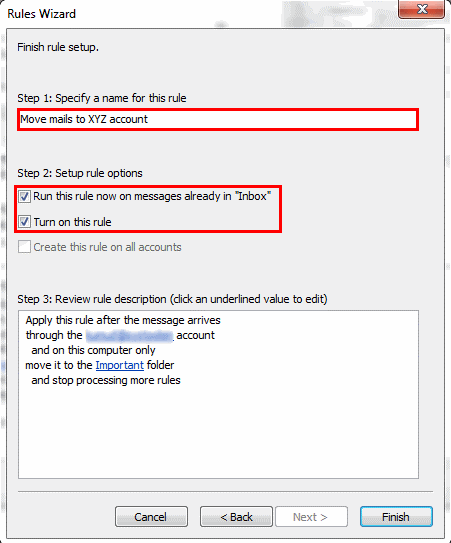
It is one of the best practices to manage databases. There are With few more options of exceptions, you can customize these rules in best way possible. However, if you find it difficult you can try some other methods as well.
Solution 3: Endure Account View Option
You can utilize the view property option to organize emails of each Outlook account. If you are using Outlook 2003 or 2007 versions, select the Arrange By option in View menu and then select E-mail Account to organize emails according to accounts.
Solution 4: Customized View Option
Here are advanced steps you can take to create view to filter emails. Here are the steps you can follow.
- For Outlook 2003, select Arrange By from View menu. For Outlook 2007, it is Current View in the View menu. For Outlook 2010 and 2013, it is to navigate View tab, then Change View and after this Manage Views.
- Press New and give it a name
- After that, choose Table as type and All mail and Post Folders as default.
- Press OK and then Filter.
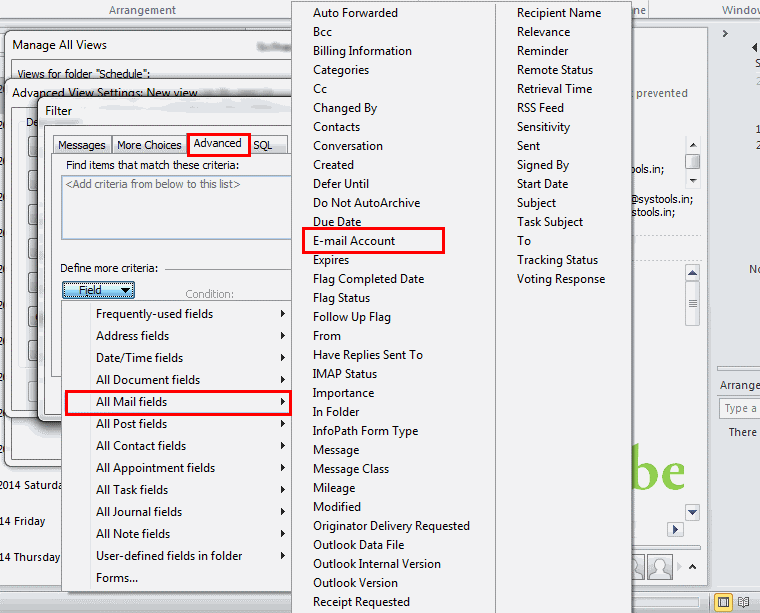
- Hit Advanced.
- After that, navigate the Field option and select All Mail Fields. From multiple options, choose Email Accounts.
- In the Filter window of the advanced menu, choose is (exactly) for condition and: Important View for value.
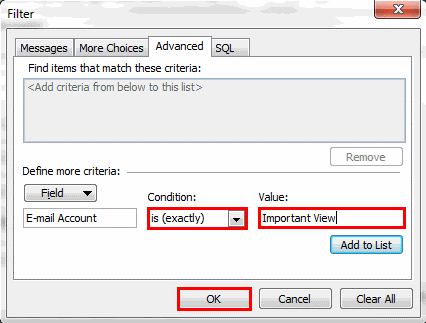
- Click Add to List and press OK twice.
- Shut down the Manage All in Views window and get back to Mail window to ensure changes are done successfully
- For every account, you can practice the same View options. Make sure you don’t forget the account name.
Conclusion
How do you find the above methods? You can choose any of them to sort emails to arrange them according to accounts. Be careful of the version of Outlook you are using because there are a few different steps to follow. If you are not tech savvy to organize emails for different accounts of your Outlook, you can take assistance from technicians.

