Summary: It is a common problem faced by several users of MS Outlook during the access of the account. The article discusses several ways to fix “Outlook Exchange Mailbox has been temporarily moved” error.
Are you facing the ‘Outlook Exchange mailbox has been temporarily moved ’ error? Don’t worry because it has solutions.
The error is noticeable when an Office 365 user tries to access the email account using MS Outlook.
Reasons for the Error
There may be several reasons why you notice the ‘Outlook Exchange mailbox has been temporarily moved ’ error. Here are reasons.
- Your Outlook profile may not be working or corrupted.
- The OST file has issues or is damaged.
- There may be antivirus or anti-malware interruptions.
- You may have faulty Add-ins
Ways to Fix “Outlook Exchange mailbox has been temporarily moved” Issue
Here are some ways you can try to fix “Outlook Exchange Mailbox has been temporarily moved” issue.
NOTE: Before you proceed for the below steps, don’t forget to back up the target Outlook data file (.OST). Else, one mistake could lead to loss of your offline mailbox data.
Solution #1: Delete Secondary Profiles Excluding the Primary One
If you have created multiple profiles in MS Outlook, it is good to delete all of them excluding the primary one. Here are the steps to follow:
- Switch off MS Outlook and then access Control Panel.
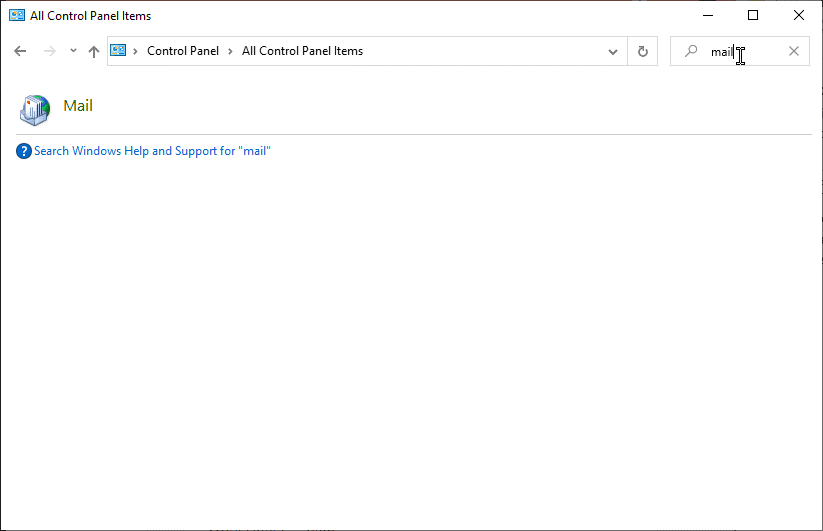
- Locate Mail to double-click on its icon to open it.
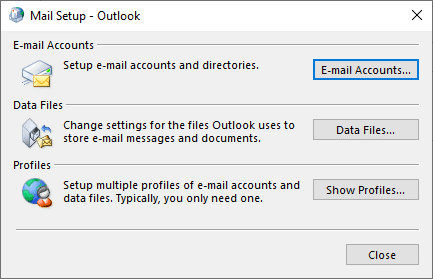
- On the Mail Setup Wizard, click Show Profiles.
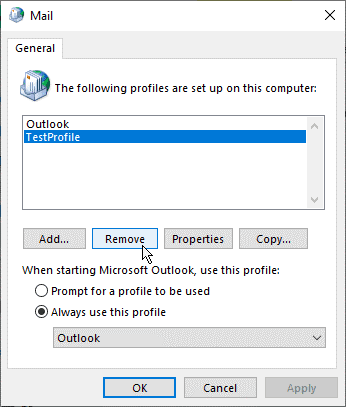
- A new window will open, select the profile that you wish to delete and then the Remove button.
- A message will appear, press the ‘Yes‘ tab here if you have a backup of the Outlook data file.

- You can follow the same process for the rest accounts leaving the primary one.
- Press ‘OK‘ to close the Mail window.
- Now, access MS Outlook to see whether the problem has fixed.
If the problem has not fixed, you can create a new account and then delete the original Outlook profile.
Solution #2: Creating a New Outlook Profile
Here are the steps you can perform to create a new Outlook profile.
- Switch off MS Outlook and navigate the Control Panel.
- Here, double-click on Mail to open it.
- In the Mail Setup window, click on Show Profiles.
- A box will appear to create a new profile. Profile a profile name, and then the OK button.
- In the Add Account wizard, create a new user’s email account. As the process is done, press the Finish tab.
- On the Mail window, select the original Outlook profile and press the Remove tab.
- A warning message can appear. Press ‘Yes’ if you have already created Outlook data file backup.
- In the Mail window, choose the recently built new Outlook profile and check the Always use this profile option after selecting the “New Profile” option.
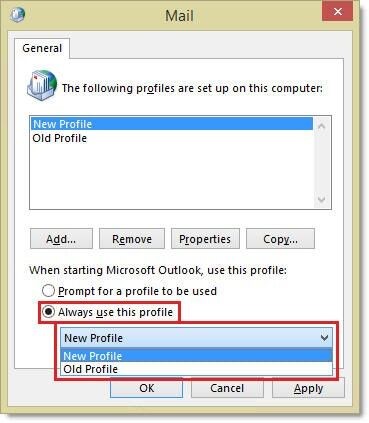
- Click OK to complete the process.
Now, you can check whether the problem has fixed. If it is not resolved, you have the next process.
Solution #3: Activating the Cached Exchange Mode
Follow the given steps to complete the process.
- Turn off MS Outlook, access Control Panel, and open the Mail folder.
- The ‘Mail Setup‘ window will open, here click on the Email Accounts… button.
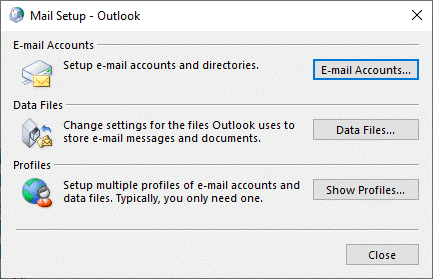
- Choose the profile and press the ‘Change‘ tab or hit twice on the profile to open ‘Server Settings‘.
- On the Change Account box, check the Cached Exchange Mode option, then the Next and the Finish button to activate or enable the Cached Exchange Mode.
NOTE: If you see the Cached Exchange Mode is already activated, you first disable it and then re-enable it.
Now, access MS Outlook application to see whether the problem has fixed or not!
Solution #4: Disable Faulty Add-ins
Do you know sometimes faulty Add-ins causes the issue? Therefore, it is essential to check whether the Add-in is faulty.
- Turn off MS Outlook.
- Press the Windows + R tabs and enter the Outlook.exe /safe message and press ‘Enter‘ to access Outlook in safe mode.
- After this, navigate the File menu, click Options and then Add-ins.
- Now, choose ‘COM Add-ins‘ in Manage and then the ‘Go…‘ tab.
- Uncheck all Add-ins and press ‘OK.‘
- Turn off Outlook and restart it as you do.
Confirm whether the error has fixed. If it has resolved,
- Navigate the ‘File menu, then Options > Add-ins‘ and press the ‘Go…‘tab
- Enable Add-ins one after another to notice which one is causing the problem.
- If you notify errors in an add-in, don’t download it.
If the error has not fix, the next step is to repair your Outlook data file.
Solution #5: Repairing OST File
If OST file has minor errors, the problem can be fixed with the Inbox Repair tool (SCANPST.EXE). If the problem is big, the built-in applications will not work. At this context, you can use a professional OST repairing application.
TrustVare OST Recovery application is one of the apps to repair damaged OST files and convert these files into PST or other file formats. It is all in one solution to recover ANSI and Unicode OST files. The tool performs recovery process at fast speed and with 100% precisions. Users with zero technical skills can run the program independently because of its user-friendly interface.
Conclusion
Overall, you can fix the ‘Outlook Exchange mailbox has been temporarily moved ’error in many different ways. We recommend you to follow the abovementioned manual steps only when you are technically advanced. It is not for a novice.

